Oil Painting for Beginners - Everything You Need to Know to Get Started
Oil Painting Basics
Many people feel intimidated or overwhelmed by oil painting. They don’t know where to start, are confused about the process, or are worried about solvents and toxins - hazards that I’m happy to say can be largely avoided! The truth is you don’t need many materials to start oil painting - just a tube of paint, a brush, a painting surface, and a little patience.
The best part is, you can go at your own pace. That is why I created this step-by-step comprehensive guide. Ultimately, with a little more information, what initially feels intimidating around beginning oil painting may actually end up being its selling point.
So, read on or click on anything in the outline below if you’d like to jump ahead to a particular section:
-
Oil Painting Supplies
-
Oil Painting Process
-
Additional Oil Painting Resources
Oil Painting Supplies
Oil Paints and Brands
What is oil paint? The best quality oil paints are made with just two ingredients: oil, such as linseed oil or walnut oil, and pigment. The process of making oil paint involves grinding up a pigment, usually with machines, into a very fine consistency, and then adding oil.
The oil is what binds the pigment together into a paint - it's known as the "binder." The ratio of pigment to oil is usually around 3:1 depending on the pigment.
Paint-maker Winsor and Newton created a great video showing the process of making paint, which you can watch below. They also explain why some pigments are more expensive than others:
When it comes to brands of paint, in my experience, Gamblin's Artist's Oil Paints and Winsor and Newton's Artists' Oil Colours are both good quality and widely available.
Gamblin and Winsor and Newton also both make more affordable student-grade lines called 1980 and Winton, respectively, which are not meant for professional artists but can be fine for beginners. Student-grade oil paints in general are less expensive than professional-grade oil paints, but for good reasons. Student-grade oil paints use less pigment and often contain other fillers, binders, and driers, which reduce the overall vibrancy and quality of the paint.
If you'd like to try the highest quality oil paints, my recommendations would be Williamsburg's Handmade Oil Paints, Michael Harding's Artists Oil Colors, and Natural Pigments' oil paint line called Rublev. These brands use linseed oil as their binder and they don't use fillers, extenders, or dryers (Williamsburg adds a very small amount of beeswax to their formulations). In my opinion, they have a more "buttery" consistency than other brands, which can be stiffer out of the tube. Formulas vary between manufacturers and you may prefer working with one over another or notice different results with the same pigments. It's worth it to research and test different brands of artist's oil paint to figure out what you like and which lines suit how you paint.
Other lines to look at include:
- Grumbacher (Linseed oil)
- M. Graham (Walnut oil)
- Old Holland (Linseed oil)

Non-Traditional Oil Paints
Depending on your situation or time constraints, non-traditional oil paints may be a good option.
Advancements in oil paint technology have allowed for new formulas to be developed beyond the standard oil-and-pigment combination, including water-soluble oil paints and alkyd oil paints.
Water-soluble oil paints are made with modified oils. They behave like traditional oils except water can be used to thin the paint and all that’s needed to clean paintbrushes is soap and water.
One of the most interesting things about water-soluble oils is that you can create watercolor-like effects and semi-transparent layers with ease. For example, I created a batik effect by dripping wax on a still-wet layer of paint. Once the paint and wax were both dry I carefully scraped the wax off and then applied more layers of paint:

Batik technique and the finished painting. Watch the tutorial for this effect here. This is just one example of what is possible with this paint. Learn more and purchase water-soluble oils here.
Alkyd oil paints are made with polymerized oil. When mixed with a solvent, alkyd oils behave similarly to traditional oil paint. These paints are popular among some artists because they dry within a day or so, letting artists work faster because they can add layers sooner. Learn more and purchase alkyd oils here.
Creating a Color Palette

Example of a paint palette (image source). Many artists like to use a wood palette with a hole like the one above to put their thumb through. Other artists will use a piece of glass with tape on the edges. Some will even use a piece of foam core.
This is my favorite paint palette, which fits inside of this airtight palette seal. I like it because it is easy to clean, doesn’t stain, and when paired with the palette seal, will prevent your paints from drying prematurely between painting sessions. I put mine on a table or small caddy beside whatever painting I’m working on.
Palette refers to the flat surface that you put blobs of paint onto and use to mix your paints. Palette also refers to the set of colors that you have chosen to work with. This is called your color palette.
When it comes to oil painting for beginners, you can start with a basic color palette consisting of red, yellow, and blue (the primary colors), white, and black.
However, you will get a wider range of colors if you swap the black for Burnt Umber. For example, to make a richer black color, you can mix Burnt Umber and Ultramarine Blue. To get a muted yellow, you can mix white, yellow, and Burnt Umber.
Some artists will suggest including a “warm red” and a “cool red,” a “warm blue” and a “cool blue" to enhance a sense of distance or dimension in their work (learn more about using “color temperature” in painting here). There are countless choices.
I think it’s worthwhile to explore different hues and decide for yourself what colors you want to use. After all, having your own special blend of colors will make your work feel more cohesive and be more recognizable (i.e. "That must be a so-and-so painting!").
With that said, I’ve created a list of lightfast (Level I, which is the highest rating) and durable paints, which you can access and download as a PDF here.
There are over 100 colors listed and you won’t need all of them but from that list you can create your own unique palette. To simplify things, I’ve also created a couple of example palettes below. The first one is for anyone looking for a basic set of colors to get started with. The second lists the paints currently on my palette.
Example Palette #1
Limited or beginner’s palette with just 5 colors:
- Titanium White No 1 (PW6)
- Cadmium Lemon (PY35)*
- Cadmium Red (PR108)*
- Ultramarine Blue (PB29)
- Burnt Umber (PBr6)
Order all colors in 1.25 oz tubes here or 5 oz tubes here
Example #1 as a PDF
Example Palette #2
The staple colors currently on my palette:
- Titanium White (PW6) - PW6 is brighter, cooler, and more opaque than PW1; I often use PW6 on its own
- Flake White (PW1) - PW1 is my primary white for blending as it does not overwhelm other colors
- Quinacridone Magenta (PR122)
Order all colors in 1.25 oz tubes here or 5 oz tubes here
Example #2 as a PDF
Color study PDFs
Notes:
-
I’ve listed the pigment codes next to the colors because manufacturers won’t always use the same pigments for paints with the same name. This is important because not all pigments have the same permanence or lightfastness.
-
I have 2 whites on my palette because PW6 is brighter, cooler, and more opaque than PW1; I often use PW6 on its own whereas PW1 is now my primary white for blending as it does not overwhelm other colors. Sometimes I'll add a little PW1 to the PW6 if I need to increase opacity or tinting strength but I like having both in separate tubes to be able to modify the amount of each.
Pigments to avoid include Alizarin Crimson (PR83) and Zinc White (PW4). PR83 has inferior lightfastness and will start fading within a decade or two while some research suggests PW4 is prone to delamination and cracking over time. Further information on Zinc White's issues can be found here.
Learn about terms such as lightfastness and permanence here.
Learn more about how to read a paint label here.
Watch color mixing and paint comparison videos here.
*A note on Cadmium: in general, the pigments used in paints - whether you're using watercolor, acrylics, or oils - are all the same. Oil paint is not more dangerous than other types of artist's paints. When it comes to Cadmium: "Cadmium itself is a heavy metal and is toxic but cadmium pigments are not classified as dangerous for use... The level of soluble cadmium in the pigments is so low that no hazard warnings are needed and they pose no greater risk after swallowing or breathing in than other pigment types. Cadmium pigments are restricted for certain applications but this restriction does not apply to artists’ colours." (Source)
**A note on Lead White: Natural Pigments, the maker of Rublev, wrote to me via email: "Nitrile, vinyl, and latex gloves are adequate skin protection from lead white paint. Please be aware that ingestion is the main route of exposure to lead paint. There are no toxic fumes or vapors from lead white paint. You can clean your palette of lead white paint the same as you do with any other color."
Oil Paint Brushes and Tools

Some artists prefer to use natural animal hair or bristle brushes, such as hog hair, because you can “load” them with a lot of paint and the strokes create a textured, more traditional look. If you are interested in painting in this style, a great line to get started with is Blick.
One of the downsides of animal hair brushes is that they don't maintain their tips, especially in smaller-size brushes. Animal hair brushes also tend to shed more hair into your work. That said, there are some methods that help these brushes last and keep their shape. For example, some artists use a small amount of hair gel to shape their brushes. Others use Brush Shaper.
For capturing small details, I prefer synthetic brushes and Silverwhite is the brand that I find myself coming back to. These brushes are not very expensive and have lasted me a relatively long time. The smaller round brushes in particular have been superior to other brands.
For beginners, a simple set of round brushes is a fine place to start.

The palette knife is another tool that some artists use. Palette knives are often used to create a thick texture sometimes referred to as impasto technique. Look up “palette knives and oil painting” on YouTube if you’d like to see how different artists use these tools. If you’d like to try one or two out, Blick makes a great basic line of palette knives.
Linseed Oil and Paint Mediums

If you do add any oil, it is important to keep the fat-over-lean principle in mind to ensure the longevity of your paintings. What this generally means is the thinnest and least oily layer of paint should be on the bottom while the thickest and/or oiliest layer of paint should be on the top.
If you'd like to get a more in-depth understanding, this video offers the explanation I've seen regarding fat-over-lean. The bottom line: paint in thin layers with as little medium as possible. Or, use paint directly out of the tube and apply it in thin layers, possibly with the exception of the top layer, which can have more texture. Also, unless you are painting Alla Prima style (all in one layer), be sure to let each layer of oil paint dry before starting a new layer.
There are many many more mediums that you can experiment with and I recommend exploring Gamblin's Medium Guide as well as Rublev's Medium Guide if and when that feels relevant.
Canvases and Panels
Blick Studio cotton canvases and Blick Premier cotton canvases have some texture and are great for acrylic paint, heavier applications of mediums, and abstract pieces. The canvases are also back-stapled to the frames, which makes it easy to remove if re-framing is ever needed in the future. The Premier canvases are going to be a heavier weight and higher quality than the Studio canvases, and more expensive. So, if you just want to practice, go ahead and get the studio canvases.
Alternative painting surfaces include hardboards, panels, and canvas mounted on panels. One of the upsides of using panels is that they are flat and smooth and don't "give" when you rest your hand on them. Panels are less flexible than canvases (you may hear people refer to them as rigid surfaces or rigid substrates). Over time, paint on rigid substrates is less likely to crack due to movement. In other words, they are more archival. However, one of the downsides of panels is that because they are less flexible than canvases they are more easily damaged when bumped. Consider getting a small board or panel to see if you prefer painting on them over stretched canvas.
For hardboards, Ampersand Gessobord is a good choice and is ready to be painted on. Sizes go up to 60 x 72 inches.
For canvas panels, take a look at Masterpiece Ventura Hardcore Pro Canvas Panels. These linen canvas panels are smooth with a slightly uneven texture due to the nature of the linen fibers. The linen benefits from being secured to a stable backing and the 1/8th inch thickness makes these panels easily frame-able. Sizes go up to 20 x 24 inches.
Take a more comprehensive look at painting supports here.

Oil Painting Process
Creating a Composition
Creating a composition in painting involves arranging the elements of a painting in a way that is visually pleasing and effectively communicates what you are trying to paint. Here are some tips for creating an engaging composition:
- Establish a focal point. The focal point or focus is the area of the painting that draws the viewer's attention and is the most important part of the painting. Decide what the focal point of your painting will be and place it in a prominent position.
- Consider the rule of thirds. The rule of thirds is a basic principle of composition that involves dividing the canvas into thirds both vertically and horizontally, and placing the important elements - such as the focus - of the painting along those lines. This creates a sense of balance and harmony in the painting.
- Create depth. Use overlapping elements, atmospheric perspective (if painting landscapes), scale, and areas of shadow and light to create a sense of depth in your painting.
- Use contrast. Contrast is an important tool for creating visual interest in a painting. Contrast can be achieved through the use of light and dark values, complementary colors, or contrasting textures.
- Experiment with different compositions. Don't be afraid to test out different compositions before deciding to move ahead with one of them. Try creating a few sketches or thumbnail drawings to see which composition is most appealing to you.
A very simple composition to start out with would be a still life. A still life is a painting study of inanimate objects, such as fruits or vegetables in a bowl on a table or other objects arranged together. Place yourself at a desk or at an easel so that your still life is in view, put some small blobs of paint on your palette, and then paint away! Take care to notice where the lightest parts of your composition are and the darkest parts. If you don't like something that you painted, scrape it off with a palette knife and try again.
For more guidance around compositions, check out this article.
Below is a great easel option for smaller paintings:
Understanding Value and Color
In painting, value is what creates a sense of depth and dimension. While color adds intensity and emotional impact, value is essential for structure, clarity, and the overall effectiveness of a painting. Both elements work together to enhance the visual experience.
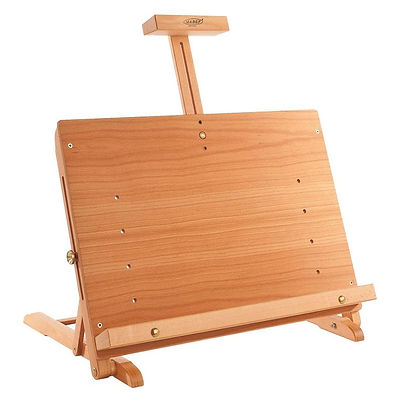
This is Mabef's Table Easel M-34 model. You can learn more and purchase one here. They also have A-frame and H-frame models for larger paintings.
Oil Painting Techniques
Having an understanding of basic painting techniques will offer you more ability to express yourself in your paintings. Below are several techniques you might use when you paint:
- Underpainting: this is the first layer of your painting and functions as the foundational layer that everything else is built on. Although there is no set way to do an underpainting, many artists will make basic outlines and fill in values with one color that has been diluted with solvent. In other words, the underpainting is often a monochromatic guide for the artist to then add color, light, shadow, and detail.
- Dabbing: this technique involves lightly blotting paint onto your painting surface with a hog hair bristle brush (or other stiff brush). Many artists use this technique for impressionistic leaves or water.
- Gestural: this is a very expressive technique that allows the artist some spontaneity. When an artist is painting in a gestural way, they are using wide sweeping movements with their brush to create more rhythmic and dramatic marks in their painting.
- Sgraffito: this technique refers to scratching through a layer or layers of paint with the pointed end of a paintbrush or a palette knife to reveal something else, either a color from a previous layer or perhaps creating a pattern or shapes with the scratching.
There are many techniques listed here on Wikipedia if you’d like to discover more methods of painting.
Alla Prima
The oil painting style Alla Prima (Italian for “at once”) refers to adding wet paint directly to wet paint. Instead of letting one layer dry and then painting another layer on top (known as the indirect method), painting Alla Prima style essentially means completing a painting in one sitting.
In addition to the video below, which features artist Chris Fornataro painting a still life of an apple, you can see some great examples along with further instructions here.
If this way of painting appeals to you, you might also check out the book Alla Prima II by Richard Schmid, which is considered by many Alla Prima painters to be the authoritative guide.
Glazing with Oil Paint
Glazing is a method that can be used in the final layers of a painting to add depth and shadow. Typically, a little medium is added to oil paint to make it semi-transparent, which is then selectively painted over areas of a piece.
Below is a demo by artist Andrew Tischler outlining how to glaze with oil paint:
Varnishing Your Painting
When you are completely finished with your painting and it has dried (the general rule is 6 months), you may then add a layer or two of varnish. Not only does varnishing saturate the colors in your painting, it protects your painting from dirt, dust, and sunlight to some degree. My favorite varnish is Gamvar.

This is a superb varnish that can be removed with Gamsol if needed. It is available in Matte, Satin (aka semi-gloss), and Gloss. Some artists prefer Gloss to deepen colors and if a less glossy look is desired will use additional dry brushes to "paint" over the varnish once it's applied, which will absorb excess varnish.
Note: if you have applied thick layers of oil paint, it may take up to a year or longer for your painting to dry.
Clean-Up and Studio Safety
Working in a well ventilated area is recommended. Set up your workspace with a fan that blows air away from where you’re working toward an open door or window in order to keep air moving. Air flow is less of an issue if you are not using solvents.


I mainly use Turpenoid Natural to clean my paint palette and brushes. To clean my palette, I’ll use a small amount of Turpenoid Natural on a paper towel to pick up any excess paint. To clean my brushes, I’ll put a bit of Turpenoid Natural on a paper towel then gently move my brush back and forth getting as much excess paint off as I can, then I’ll use warm water and Masters Brush Cleaner to remove the remaining paint.
It’s a good idea to get a designated oily metal trash can to dispose of rags or paper towels that are saturated with oil and oil paint. If you wipe excess paint on cloth or paper towel then this is a must because there is a small chance that these can spontaneously ignite and a specially designed trash can will keep fire contained.
Pigments in their raw powder form (i.e. prior to being blended with linseed oil or another binder) generally pose a much greater health risk than paint from a tube. Paint from a tube that has been blended means there is next to no chance of inhaling pigment, and if you wear gloves and keep your studio clean there is also very little chance of ingesting pigment. Sanding artwork can create dust, however, and precautions such as wearing an N100 mask (aka particulate respirator) along with gloves will reduce the risk of inhaling and ingesting dust.
Some paint thinners are toxic. Exposure to the vapors of turpentine and mineral spirits (even odorless ones) should be limited or avoided altogether. Examples of non-toxic options to thin paint include the seed oils mentioned earlier or other mediums that specifically state “non-toxic” on the label.
All of this said, paint, thinners, and mediums etc. should always be out of reach of children and animals! It's also a good idea to wear gloves - such as these nitrile gloves - while painting and keep food out of your painting area.
Oil Painting Resources
Online Oil Painting Tutorials
Independent local art stores typically have knowledgeable employees whom you can ask specific questions about what materials will help you create the art that you envision.
YouTube Channels with great instruction and oil painting tips at no cost include:
- Andrew Tischler (Landscapes and portrait painting)
- Chelsea Lang (Portrait painting)
- Michael James Smith (Landscape painting)
- Nikita Coulombe (Wildlife painting and color mixing)
- Paint Coach (Chris Fornataro) (Painting techniques, alla prima)
- Yupari Artist (Portrait painting)
Paid online drawing and painting fundamentals courses include:
- Jeff Hein (Classical painting mentorship)
- Juliette Aristides (Drawing fundamentals and portrait painting)
- Matt Smith (Landscape painting)
- PaintTube.tv (Different subjects taught by a variety of artists)
- Sadie Valeri (Classical drawing and oil painting florals, still lifes, and portraits)
- Raw Umber Studios (Online life drawing classes updated weekly; free class on the last Sunday of every month)
Many art supply manufacturers also provide free guides, tips, and educational links:
In-Person Oil Painting Classes
For in-person instruction, art ateliers tend to be less expensive than universities and provide more technical instruction whereas university courses usually focus more on theory.
Ateliers typically offer multi-day oil painting and drawing workshops tailored to different skill levels. I've listed some options below:
-
Atelier Dojo in Austin, Texas
-
Grand Central Atelier in Queens, New York
-
New Salem Museum and Academy of Fine Art in New Salem, Massachusetts
-
Watts Atelier in Encinitas, California
If none of these are nearby, you might search for “oil painting classes near me” or "art atelier near me" on Google or your favorite search engine and see what pops up. The Art Renewal Center (ARC) also has a search option here.
If you're interested in traveling, you might look into destination art classes such as Workshops in France, which feature a range of talented instructors.
Some individual artists, including Joe Paquet, Thomas Fluharty, Ben Bauer, and Jeremy Lipking, also offer mentoring, on-site group classes, and one-on-one instruction.
Oil Paint Technical Information
When in doubt, check out manufacturer websites directly for technical information about the paints and materials that you work with. Often, there is a phone number listed somewhere on your painting supplies that you can call.
Resources for Further Learning


- The Painter’s Handbook by Mark David Gottsegen is perhaps the most useful all-around resource for learning more about painting materials and studio safety.
- Traditional Oil Painting by Virgil Elliott is considered by some to be the "painting Bible." It is a great resource for those wishing to study and learn the techniques of the Old Masters like Rembrandt and Vermeer. Elliott also emphasizes and explains the proper use of materials in order to create lasting paintings.
- In The Oil Painter's Color Handbook, author Todd M. Casey argues that out of all of the main concepts of painting - drawing, light, shadow, value, form, composition, and color - color is the most important because it has the power to evoke an immediate emotional response. He explores how color impacts composition, psychology, and perception with vivid examples.
Notes
I hope this article has provided a solid foundation for beginning oil painting. Mastering oil painting takes patience and practice to be sure, but even if every painting isn’t a masterpiece, you’re probably going to have a lot of fun.
If you’re interested to see a complete list of art materials and supplies needed to set up your art studio, click here.
See more articles here.
Affiliate Disclosure
Please note that this page contains product affiliate links. I may earn a small commission from qualifying purchases. There is no additional cost to you and your purchase supports the creation of more articles and videos.